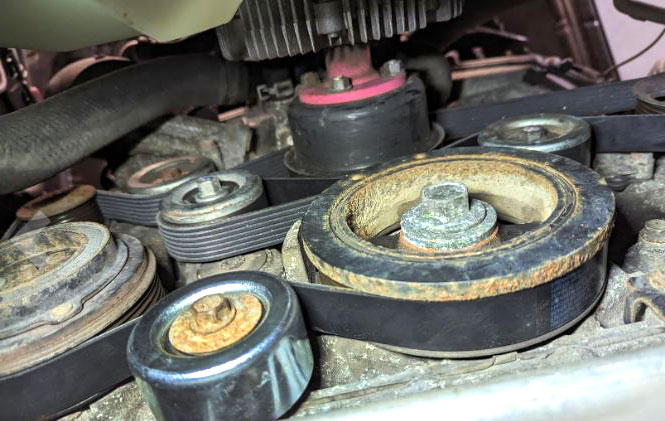
A serpentine belt, a wide and thin-styled belt with multiple ridges, plays a crucial role in driving various components like the alternator, water pump, power steering pump, and AC compressor. Regular maintenance involves inspecting and replacing the belt, typically recommended by the vehicle's manufacturer at intervals ranging from 20,000 to 100,000 miles, depending on your car model. Here's a simplified step-by-step guide to help you replace a serpentine belt.
Tools/Supplies Needed
⦿ Ratchet and socket set
⦿ Torque wrench
⦿ New replacement belt
⦿ New tensioner
⦿ New pulley
⦿ Wrench set
⦿ Jack and axle stands or ramps

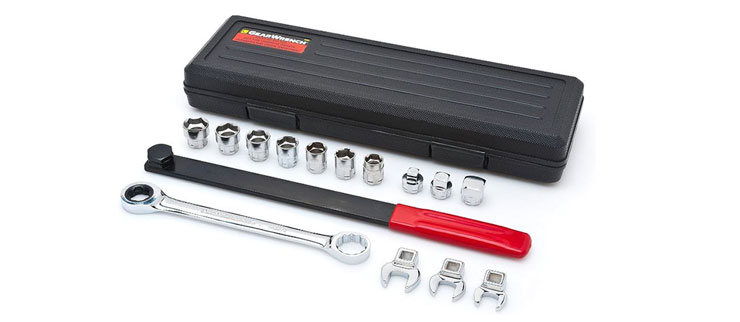
FIND HERE THIS TOOL: Ratcheting Serpentine Belt Tool Set
Simple Steps to Replace Your Serpentine Belt
Routine maintenance plays a crucial role in keeping your vehicle running smoothly, and swapping out the serpentine belt is a task that can be accomplished with ease using basic hand tools.
Before embarking on the serpentine belt replacement process, it's advisable to explore the associated costs. Understanding the serpentine belt replacing cost provides valuable insights, ensuring you're well-prepared for this routine maintenance task. Take a moment to consider the expenses involved and make an informed decision before proceeding with the replacement.
In this step-by-step tutorial, we'll walk you through the process, and share valuable insights applicable to engines. The guide ensures a hassle-free serpentine belt replacement experience. Let's dive into the essential tools, preparation steps, and the meticulous process to maintain your vehicle's reliability.
1. Locate the Tensioner Mechanism
Use a 17mm wrench to pull the tension back.
Loosen the 13mm pivot point bolt and the 13mm bolt locking the slotted adjustment bracket.
Tighten the 13mm bolt to lock the slotted portion in the bracket.
2. Remove the Belt
Pay attention to its position; take photos or make a diagram for reference.
Remove the belt from the pulleys, starting with those on the backside.
3. Inspect and Compare Belts
Ensure the old and new belts are the same size.
Replace the belt if it shows signs of cracking for reliability and safety.
4. Tensioner Replacement
Remove the cap on the pivoting pulley, then the 13mm bolt.
Remove the tensioner by taking off the two 13mm fasteners.
Pair up the old and new tensioner to ensure correctness.
Install the new tensioner mechanism and then onto the engine.
5. Remove the AC Compressor Belt
Access the tension from the underside of the vehicle.
Loosen the 13mm bolt and the 10mm for the slotted bracket.
Pull back the tension, lock the 10mm bolt, and remove the belt.
6. Replace the Pulley if Needed
Replace the pulley if it shows signs of wear or noise.
Pair up the old and new belts and install them, ensuring proper orientation.
7. Install the Final Outer Belt
Ensure proper routing and installation on ribbed and smooth pulleys.
Push the serpentine belt in from the smooth side; it should flex about 1/2".
8. Final Tightening
Tighten the belt to the specified specifications.
9. Check and Start the Engine
Ensure the belt is centered on each pulley.
Start the engine and let it idle for at least 60 seconds to ensure correct operation.
10. Finishing Touches
Replace any removed parts or coverings.
Take your vehicle for a spin to confirm the serpentine belt's proper functioning.
Remember, replacing a serpentine belt is a routine part of auto maintenance, and with these steps, it becomes a manageable task for vehicle owners.


DIY to Replace Your Serpentine Belt
Swapping out your serpentine belt is a routine maintenance task that can be easily tackled with basic hand tools. In this guide, we'll walk you through the process using a 2015 Volkswagen Tiguan. If you get virtual tech support, DIY just got simpler. Here's what you'll need and how to get it done.
Tools Needed
⦿ 17mm socket (6 or 12 point)
⦿ Ratchet or serpentine belt tensioning tool
⦿ 4mm Allen key
⦿ New replacement belt
⦿ New tensioner
⦿ New pulley
⦿ Wrench set
⦿ Jack and axle stands or ramps
Step 1: Preparation
Securely raise your vehicle using a jack and axle stands or ramps.
Remove any components obstructing your view, like the catch can, right front wheel, and wheelhouse liner.
Step 2: Belt Marking and Routing
If removing the belt for another repair, mark its direction of travel with an arrow.
Take note of the belt routing; snap a photo or make a drawing for reference.

Step 3: Tensioner Adjustment
Locate the serpentine belt tensioner and insert a lock pin or a 4mm Allen key to hold it in place.

Use a ratchet, breaker bar, or serpentine belt tensioning tool to push the tensioner towards the front of the vehicle.
Slip the belt off the pulleys.

Step 4: Belt Inspection and Removal
Inspect the old belt for wear, and compare it to the new one for size verification.
Remove the old belt by slipping it off the pulleys.

Step 5: Tensioner and Pulley Replacement
If needed, replace the tensioner and pulley.
Install the new tensioner mechanism and secure it back onto the engine.
Step 6: AC Compressor Belt Removal
Access the AC compressor belt tensioner from underneath.
Loosen the bolts, release tension, and remove the belt.
Step 7: Installing the New Belt
Begin by placing the new belt around the crankshaft pulley.
Tuck it around the tensioner, air conditioner, and alternator.
Tension the belt using a ratchet or a serpentine belt tensioning tool.

Step 8: Final Checks
Perform a visual inspection of each pulley to ensure proper alignment.
Make sure all belt ribs align with pulley ribs.
Step 9: Completion
Slowly release tension, remove the ratchet, and ensure the belt is correctly seated on all pulleys.
Perform a final inspection, verifying the belt's proper alignment.

For the VW Tiguan or any 2.0t CCTA/CBFA Volkswagen engine and the Audi 2.0t, the serpentine belt replacement process will be quite similar. The shared 2.0t engine platform means that the general steps outlined for the VW Tiguan will apply to the Audi 2.0t engine as well. The commonalities in design and layout make the replacement process consistent between these models. So, whether you're working on a VW Tiguan or an Audi 2.0t, the steps provided earlier can be followed for a successful serpentine belt replacement. Always refer to the specific vehicle's repair manual for any model-specific instructions or nuances.
This straightforward DIY ensures a hassle-free serpentine belt replacement. Remember, a virtual tech support service can be a valuable resource if you ever need assistance with more complex circuits or DIY projects.


 English (United States) ·